|
To illustrate the Fund Administration Application we will work through capturing the payment schedule of a municipality for the next financial year.
1. If you are not already in the Fund Administration application, click Fund Administration on the Application Menu.
2. Click Schedule on the Content tree to open the folder and then Infrastructure.
3. Select the next financial year from the Filters pane.
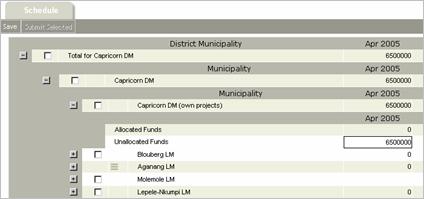
You will now be presented with a list of all municipalities that you are responsible to submit payment schedules for. In the example below, the user is logged in as the PMU Manager for Capricorn DM. As such the list will include the DM itself (own projects) as well as all the non-funding municipalities that the PMU is responsible for. Note that it does not show funding municipalities such as Polokwane because the PMU is not responsible for submitting their payment schedules.
|
Capture schedules |
4. For every month of the year, enter an amount into the Unallocated field so that the sum of the Unallocated and Allocated amounts equal the desired schedule for the month. Remember that the Allocated field is calculated from the sum of all project cash flows for the month in question (see Reference). In the example above there are no registered projects reflecting a cash flow for Apr 2005, so the schedule consists entirely of unallocated funds.
Note that the rightmost column Variance decreases as you complete each month and that it should become zero after completing the last month because the total of the 12 payment schedules must equal the allocation.
|
Save schedules |
5. Once you have completed a municipality (or earlier if you wish) it is advisable to click Save on the Action Bar to save your work. The Save action saves everything that you might have changed for later use. It does not submit the Schedule(s) into the workflow process.
|
|
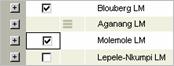
6. Once you have completed all the municipalities that you are responsible for and you are satisfied with the correctness of the information, you are ready to submit the Schedule(s) into the workflow process. This is achieved by selecting the municipalities that you want to submit (by clicking the relevant check boxes and then clicking Submit selected on the Action Bar.
Note that the
status icon  appears to
indicate that the schedule was successfully submitted. Once it has also been
recommended by the Senior Manager MIG the icon will change to
appears to
indicate that the schedule was successfully submitted. Once it has also been
recommended by the Senior Manager MIG the icon will change to  .
.
7. It is extremely important to note that what was captured above represent a version (snapshot) of the payment schedule for the monthly cycle that it was captured in. When you open the same page in the next monthly cycle you may notice some differences. The scheduled amount for the previous month will have been replaced by the amount actually transferred but this will not normally be obvious because the transfers rarely differ from the schedule. It is more likely that committed portion of the schedule would have changed if project cash flows were updated between when you submitted the schedule and the end of the monthly cycle. The MIS will reflect such changes by adjusting the uncommitted portion. You will not be able to update the schedule for previous months.
 Contents
 Index
Index Search
 Previous
 Next
Next